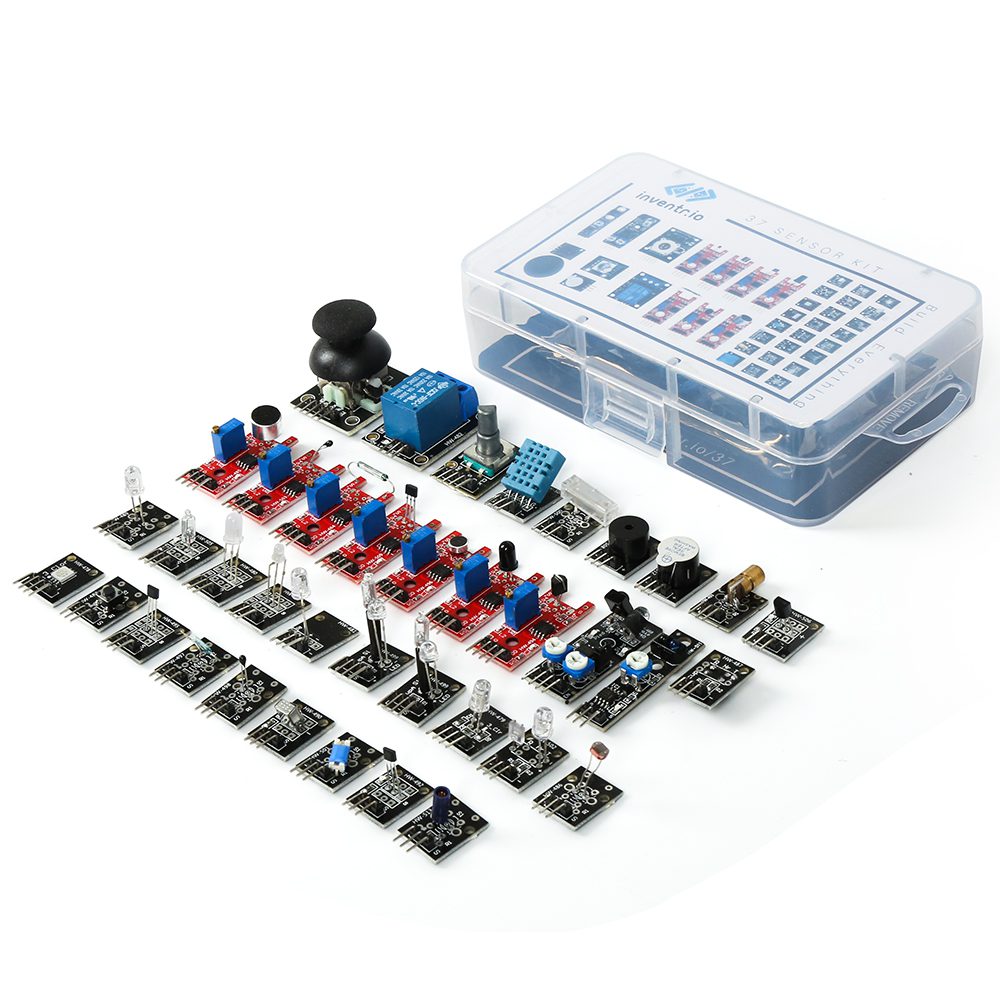
Every module in the 37-in-1 sensor kit, explained
Updated
Open a 37-in-1 sensor kit and you get a case of small boards that all look alike. Most aren't labelled with their name, only a factory part number, so the first job is working out which one is which.
This guide goes through the modules one at a time: what each one senses or does, how it reports back to your board, and where to watch it wired up. Learn the pattern once and the whole case opens up, because almost every module works one of three ways.
The three ways a module talks to your board
Every module has a row of pins: power, ground and one or more signal pins. What comes out of the signal pin is what matters, and there are only three kinds.
- Digital. The pin is either on or off. A button, a tilt switch and the tap sensor all work this way, and you read them with
digitalRead(). - Analog. The pin gives a voltage that rises and falls with what the sensor feels, like the photoresistor in bright or dim light. You read it with
analogRead(), which returns a number from 0 to 1023 on the HERO Board. - Both. The red boards with a small blue knob have a comparator chip on them. They give you the analog reading on one pin and a digital on/off on another. The knob sets the point where the digital pin flips, so you can make the sound sensor trigger on a clap and ignore the room.
A few modules speak a protocol instead: the temperature sensors and the IR receiver send whole readings as data, and a library decodes them for you. The rest of the modules are outputs you drive: lights, a buzzer, a laser and a relay.
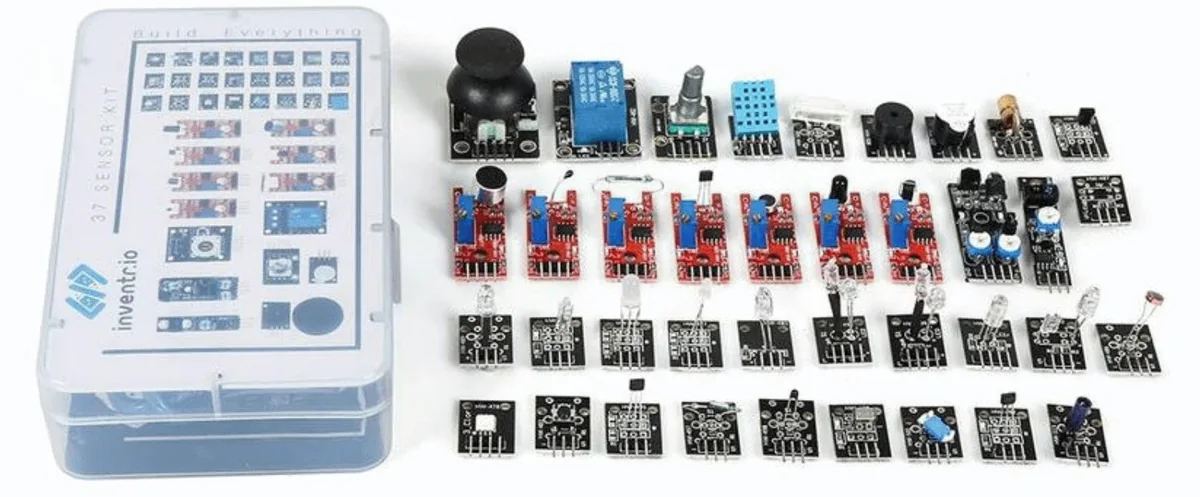
Every module, one line each
These are the 31 modules that have their own filmed walkthrough in the free SensorKit course. Each walkthrough is titled with the module's KY number and films that module on the bench, which is the quickest way to match one to the board in your hand. Each module's name opens its own page: the pinout, the wiring and the course's code.
| Module | What it does | Reads as | Walkthrough |
|---|---|---|---|
| KY-001 Temperature | A DS18B20 digital thermometer | Data (1-Wire) | Watch |
| KY-002 Shock | A spring in a tube that closes a contact when knocked | Digital | Watch |
| KY-003 Hall magnetic | Switches on when a magnet comes close | Digital | Watch |
| KY-004 Button | A push button, ready to wire | Digital | Watch |
| KY-008 Laser | A small red laser you switch on and off | Output | Watch |
| KY-009 SMD RGB LED | A tiny surface-mount LED that mixes red, green and blue | Output (PWM) | Watch |
| KY-010 Light blocking | A slot with an infrared beam across it; anything in the slot breaks the beam | Digital | Watch |
| KY-011 Two color LED | A red and a green LED in one 5 mm bulb | Output (PWM) | Watch |
| KY-012 Active buzzer | A buzzer with its own oscillator: power it and it beeps | Output | Watch |
| KY-015 Temperature and humidity | A DHT11 that reports temperature and humidity | Data | Watch |
| KY-016 RGB LED | A 5 mm LED that mixes red, green and blue | Output (PWM) | Watch |
| KY-017 Tilt switch | Closes when the module tips over | Digital | Watch |
| KY-018 Photoresistor | A light-dependent resistor: the reading follows the light | Analog | Watch |
| KY-019 Relay | A switch your board flips to turn a separate circuit on or off | Output | Watch |
| KY-020 Ball switch | A metal ball rolls to close the contact when tilted | Digital | Watch |
| KY-022 IR receiver | Picks up the signal from a TV-style remote | Data | Watch |
| KY-023 Joystick | Two knobs for X and Y, and a button when you press down | Analog and digital | Watch |
| KY-024 Linear hall | Measures how strong a magnetic field is | Analog and digital | Watch |
| KY-025 Reed switch | A glass switch that closes near a magnet | Analog and digital | Watch |
| KY-026 Flame | Sees the infrared light a flame gives off | Analog and digital | Watch |
| KY-027 Light cup | A tilt switch with an LED; two of them pass light between each other | Digital in, PWM out | Watch |
| KY-028 Digital temperature | A thermistor that trips at a temperature you set with the knob | Analog and digital | Watch |
| KY-029 Mini two color LED | A red and a green LED in one 3 mm bulb | Output (PWM) | Watch |
| KY-031 Tap | Notices a sharp knock on the board | Digital | Watch |
| KY-032 Obstacle avoidance | An infrared light and sensor that see something in front of them | Digital | Watch |
| KY-033 Line tracking | Tells a dark line from a light surface, as line-following robots do | Digital | Watch |
| KY-036 Touch | Feels a finger on its metal lead | Analog and digital | Watch |
| KY-037 Big sound | A large microphone for quiet sounds | Analog and digital | Watch |
| KY-038 Small sound | A smaller microphone for louder, closer sounds | Analog and digital | Watch |
| KY-039 Heartbeat | Shines light through a fingertip and watches it change with your pulse | Analog | Watch |
| KY-040 Rotary encoder | A knob that clicks as it turns and tells you which way, plus a push button | Digital | Watch |
The first walkthrough is open to everyone; the rest are free with a CraftingTable account.
Read one analog sensor: the photoresistor
The photoresistor is the best first module because you can see the number move. Wire its signal pin to A0, then print what analogRead() sees. Cover the module with your hand and the number changes. This is the sketch from the KY-018 walkthrough: it also blinks the board's built-in LED faster or slower with the light.
uint8_t sensorPin = A0;   // the module's signal pin
int ledPin = 13;          // the board's built-in LED

void setup() {
  pinMode(ledPin, OUTPUT);
  Serial.begin(115200);
}

void loop() {
  int sensorValue = analogRead(sensorPin);
  Serial.println(sensorValue);
  digitalWrite(ledPin, HIGH);
  delay(sensorValue);
  digitalWrite(ledPin, LOW);
  delay(sensorValue);
}Open the Serial Monitor at 115200 baud to see the readings. The photoresistor guide in the Help Center goes deeper into how the light-dependent resistor works.
Read one data sensor: the DHT11
The KY-015 sends its readings as data on a single pin, so you don't decode it yourself. Install the DHT sensor library by Adafruit from the Library Manager, then ask it for the temperature and humidity once a second.
#include "DHT.h"

#define DHT_PIN 7
#define DHT_TYPE DHT11

DHT dht(DHT_PIN, DHT_TYPE);

void setup() {
  Serial.begin(115200);
  dht.begin();
}

void loop() {
  Serial.print("Temperature = ");
  Serial.println(dht.readTemperature());
  Serial.print("Humidity = ");
  Serial.println(dht.readHumidity());

  delay(1000);
}readTemperature() returns degrees Celsius. The DHT11 is slow by design: ask the library again within two seconds and it hands back its last reading instead of a new one.
Read a knob that turns forever: the rotary encoder
A potentiometer stops at each end; the KY-040 keeps turning. It has two signal pins, CLK and DT, that switch a moment apart. Which one changes first tells you the direction, and every click moves the count by one.
#define CLK 2
#define DT 3

int counter = 0;
int lastStateCLK;

void setup() {
  pinMode(CLK, INPUT);
  pinMode(DT, INPUT);
  Serial.begin(9600);
  lastStateCLK = digitalRead(CLK);
}

void loop() {
  int currentStateCLK = digitalRead(CLK);
  // CLK changed: the knob moved one click
  if (currentStateCLK != lastStateCLK && currentStateCLK == 1) {
    if (digitalRead(DT) != currentStateCLK) {
      counter--;   // counter-clockwise
    } else {
      counter++;   // clockwise
    }
    Serial.println(counter);
  }
  lastStateCLK = currentStateCLK;
}The full walkthrough adds the push button on the third pin. If you want to try an encoder before wiring one, it's one of the parts in the browser simulator, and the rotary encoder article covers it in more depth.
What you need to use the modules
The kit is the modules and the case. To wire them you need a board, a breadboard and jumper wires. Every walkthrough uses the HERO Board, and 30 Days Lost in Space and Cogsworth City both include all three. Start with one of those if you haven't wired a breadboard before: the sensor walkthroughs are short and assume you have.
37-in-1 Sensor Kit: All 37 modules in a latching case, with the free SensorKit course: 31 filmed walkthroughs and example code.
30 Days Lost in Space: The HERO Board, a breadboard, wires and parts, with filmed lessons that teach you to wire and code from zero.
Questions
Does the 37-in-1 sensor kit come with a board?
No. It's the modules and the case. You also need a HERO Board, a breadboard and jumper wires; 30 Days Lost in Space and Cogsworth City include all three.
How do I tell which module is which?
Most modules are printed with a factory part number, not their name. Each SensorKit walkthrough is titled with the module's KY number and shows the module on the bench, so you can match them by sight.
Which modules give an analog reading?
The photoresistor and the heartbeat sensor are analog. The joystick and the seven red boards with a blue knob (linear hall, reed switch, flame, digital temperature, touch and both sound sensors) give an analog reading and a digital one.
Can I try the modules in a simulator first?
Yes. 27 of the modules are parts in the free browser simulator on craftingtable.com, alongside the HERO Board.