KY-032 infrared obstacle avoidance sensor: how it works, wiring, code and tuning
Updated
The KY-032 gives a robot whiskers made of light. An infrared LED at the front shines forward, a receiver beside it waits for that light to bounce back, and when something is close enough to reflect it, the output pin drops LOW.
Out of the bag it often seems to do nothing at all. That isn't a fault: it has two knobs, and both need setting. The course's instructors wrote down exactly how they tuned theirs, and you'll find it below.
What's on the board
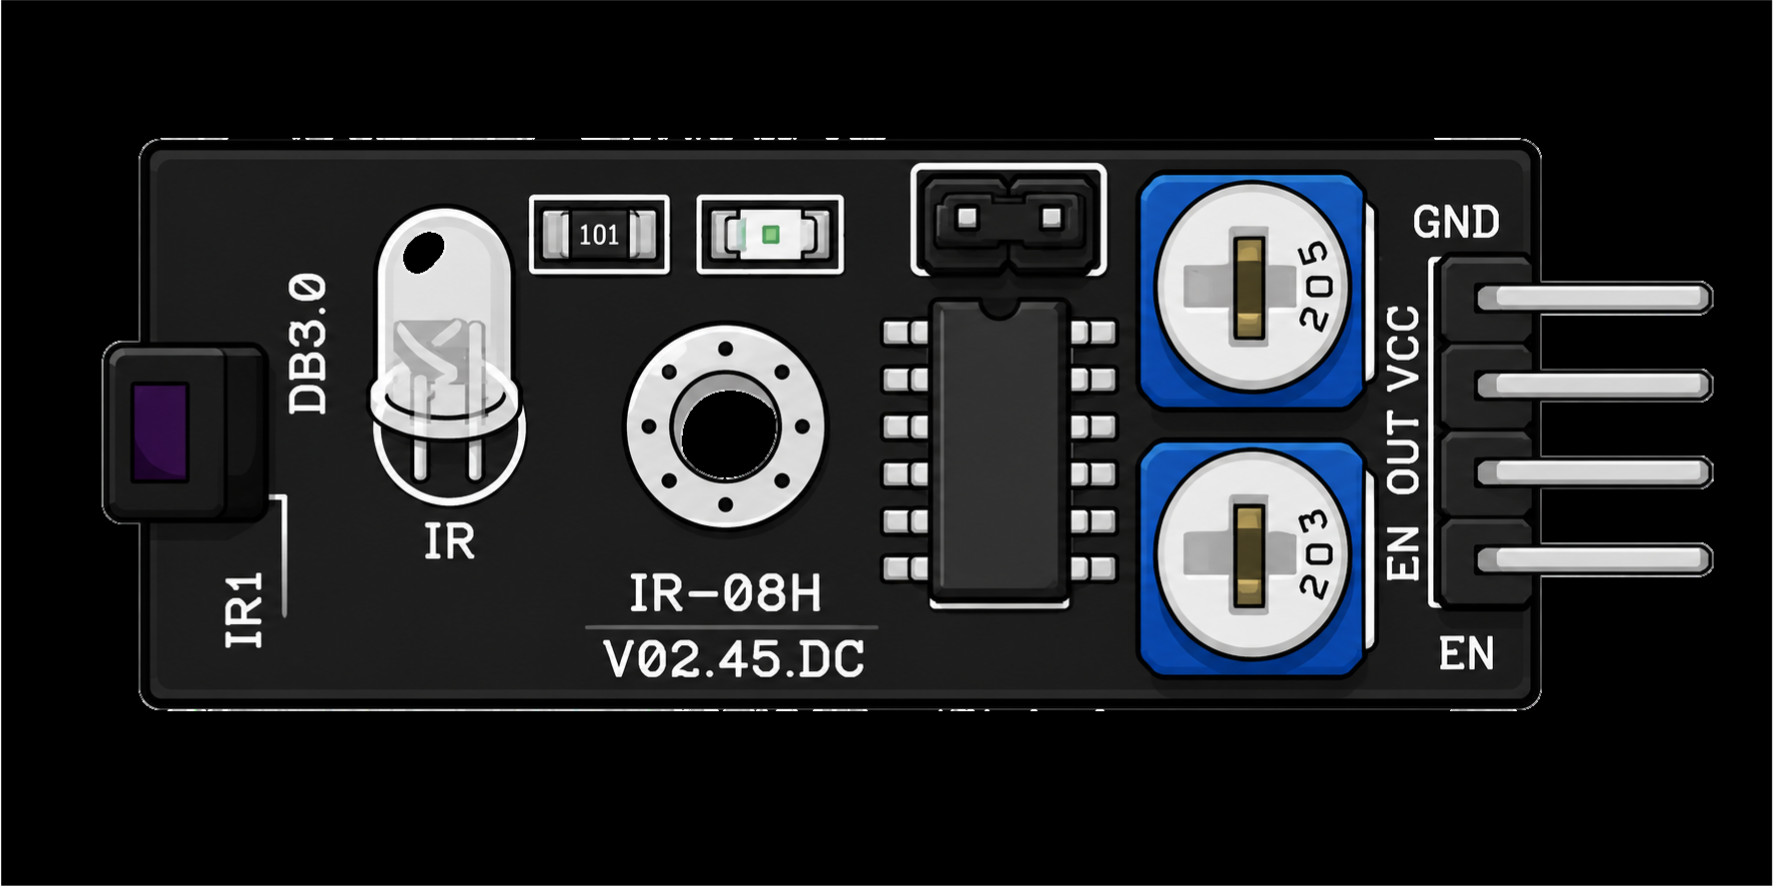
- An infrared LED and an infrared receiver, side by side at the front, facing the same way.
- Two blue trim pots. The one beside the EN jumper sets how hard the LED shines. The other sets how sensitive the receiver is.
- An EN jumper, plus a small LED that lights when the module sees something.
- Four pins: GND, + (5 V), OUT and EN, in that order along the header.
OUT is a digital signal: HIGH while the path is clear, LOW when something is detected. Like many of the digital sensors in the kit, it rests HIGH and goes LOW to report. There's no analog output, so it tells you that something is there, not how far away it is.
Wiring
| Module pin | HERO Board pin | What it carries |
|---|---|---|
| GND | GND | Ground |
| + | 5V | Power |
| OUT | 8 | LOW when something is in front |
| EN | Not connected | Leave the jumper on |
Pin 8 matches the course sketch.
With the EN jumper in place, the sensor is always on. Pull the jumper and the EN pin becomes a switch your code controls: wire it to a digital pin and set it HIGH to enable the sensor, LOW to switch it off. Your code can then switch it on only when it needs to look.
The code from the course
const uint8_t KY_032_SENSOR_PIN = 8;  // the module's OUT pin

// To switch the sensor on and off from code, remove the EN jumper,
// wire EN to pin 5, and add to setup():
//   pinMode(5, OUTPUT);
//   digitalWrite(5, HIGH);   // HIGH enables, LOW disables

void setup() {
  Serial.begin(9600);
  pinMode(KY_032_SENSOR_PIN, INPUT);
}

void loop() {
  if (digitalRead(KY_032_SENSOR_PIN) == LOW) {
    Serial.println("Obstacle in the way");
  } else {
    Serial.println("The path is clear");
  }
  delay(250);
}Open the Serial Monitor at 9600 baud. A new line appears four times a second, and you'll need it for the next step.
Tuning the two knobs
This is the calibration from the instructor's notes in the course code:
- Turn the pot beside the EN jumper, the one for the LED, clockwise as far as it goes.
- Turn the other pot, the sensitivity, counterclockwise as far as it goes.
- Hold your hand or a flat object about 10 cm (4 inches) in front of the sensor.
- Slowly turn the sensitivity pot clockwise until the module's LED comes on and the Serial Monitor says
Obstacle in the way.
The notes are honest about it: the sweet spot is narrow, and it takes some gentle nudging back and forth before detection is reliable. The same notes quote a range of 2 to 40 cm for this module. Tuned by hand on the course's bench, it gave dependable detection from touching distance out to about 25 cm (10 inches). Plan for that.
What it sees well, and what it doesn't
It's watching for its own light coming back, so the object matters. The instructor found it picked up a flat board well at almost any angle. Light, flat surfaces send back the most infrared; dark, matte ones absorb it and have to come much closer before they register. Strong sunlight is full of infrared too and can swamp the receiver, so tune and test indoors first.
Obstacle sensor, line tracker or light blocking?
All three of the kit's infrared modules use the same invisible light, aimed differently. The KY-033 line tracker points down at the floor and tells a dark line from a light one, close up. The KY-010 light blocking module shines across a slot and only sees what passes through it. The KY-032 looks forward, and reaches the furthest of the three.
What to build with it
- A robot that stops before the wall. Mount it on the front; when OUT goes LOW, stop the motors and turn. That's the use the walkthrough leads with.
- A touch-free switch. Wave a hand over it to turn a light on or off. Count the change from HIGH to LOW, not the readings, so one wave is one press.
- A doorway counter. Point it across a narrow gap and count each time something passes in front of it.
Common problems
- It always says 'Obstacle in the way'. The sensitivity is too high, or it can see the table it's sitting on. Point it at open space and turn the sensitivity pot counterclockwise.
- It never sees anything. Start the calibration again from the top: LED pot fully clockwise, sensitivity fully counterclockwise, then bring the sensitivity up slowly with your hand in place.
- It worked, then stopped. Check the EN jumper is still on. Without it, the sensor needs EN driven HIGH by your code.
- It sees your hand but not a black box. Dark surfaces reflect little infrared. Bring the object closer, or put something light on it.
Watch it on the bench
The KY-032 walkthrough in the free SensorKit course wires the module to pin 8 of a HERO Board and brings an object toward it, in about two minutes. The rest of the case is in the 37-in-1 sensor kit guide.
37-in-1 Sensor Kit: The KY-032, the KY-033 line tracker and 35 more modules, with the free SensorKit course and its code.
HERO Board: The Uno-compatible board every SensorKit walkthrough is filmed on, with its USB cable.
Questions
How far can the KY-032 detect an obstacle?
The course's code notes give 2 to 40 cm. Tuned by hand on the course's bench, it detected reliably from touching distance to about 25 cm (10 inches). Light, flat objects are seen furthest.
What does the EN pin on the KY-032 do?
It switches the sensor on and off. With the jumper fitted, the sensor is always on. Remove the jumper and drive EN from a digital pin: HIGH enables the sensor, LOW disables it.
Why does my KY-032 always detect an obstacle?
Its sensitivity is set too high, or it can see a nearby surface. Point it at open space, turn the sensitivity pot counterclockwise, then bring it back up slowly with your hand about 10 cm away.
Does the KY-032 output HIGH or LOW when it sees something?
LOW. It rests HIGH while the path is clear and drops LOW when something reflects its light back.
Does the course code work on an Arduino Uno?
Yes. It's standard Arduino code, and the HERO Board is Uno-compatible, so the same sketch and the same pins work on an Uno.