KY-038 small sound sensor module: wiring, code and a loudness meter
Updated
The KY-038 is the KY-037's little sibling: the same board, the same comparator, the same code, with a smaller microphone. That one change decides what it's good for.
In the walkthrough it mostly missed claps, but it lit up the Serial Plotter the moment the instructor blew on it. So this page is about close sounds: how to read them properly, how to measure how loud they are, and a candle you can blow out without a flame.
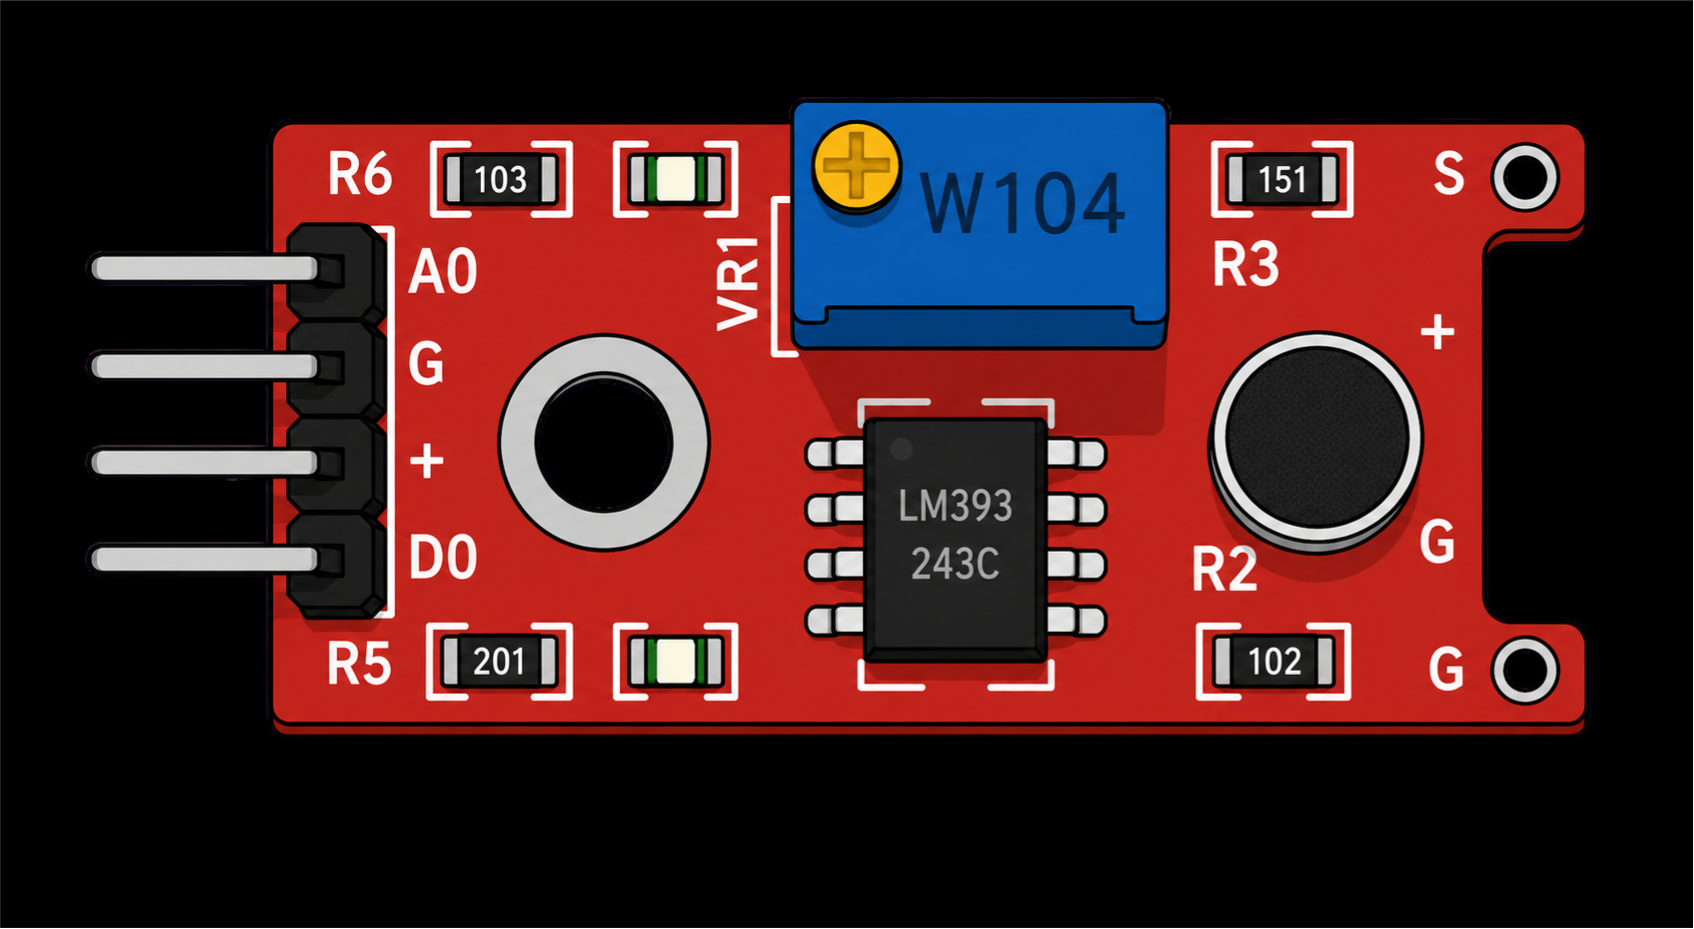
What's on the board
- A small electret microphone: the round black part. It's smaller than the KY-037's, so the sound needs to be closer.
- An LM393 comparator, the 8-legged chip, which switches D0 when the signal crosses its trip point.
- A tall blue trim pot (marked 104, for 100 kΩ) that sets the microphone signal's resting level. It's multi-turn, so expect to turn the screw a few times before much changes.
- Two LEDs, for power and for the comparator, and a 4-pin header: A0, G (ground), + (5 V) and D0.
How it reads sound
Like every microphone, it turns ripples in air pressure into a changing voltage, and what reaches A0 is the sound wave itself, wobbling around a resting level the trim pot sets. In a quiet room you get a nearly flat line. Make a sound and the line shakes; the louder the sound, the bigger the shake.
D0 is the comparator's verdict on that same signal. The course's notes put its trip point at about 510: when A0 dips below it, D0 goes to 1 and the second LED lights. With a small microphone, only a loud or close sound swings A0 that far.
That makes a single analogRead() almost useless for measuring loudness. You might catch the wave at its peak, or right at the resting level, and the number tells you nothing either way. The fix is to listen for a short window and measure how far the signal swings, from its lowest point to its highest. That's called the peak-to-peak.
Wiring the KY-038 to the HERO Board
| KY-038 pin | HERO Board | What it carries |
|---|---|---|
| A0 | A0 | The sound wave, on a resting level |
| G | GND | Ground |
| + | 5V | Power |
| D0 | Pin 8 | 1 while the sound crosses the trip point |
The walkthrough wires A0, G and + and reads the analog signal on the Serial Plotter. The course's sketch also uses D0 on pin 8, and the peak-to-peak sketches below need only A0.
The course's code
This is the KY-038 sketch from the SensorKit course, shortened. It lights the built-in LED while D0 is high:
const uint8_t KY_038_DIGITAL_IN = 8;  // D0: 1 while the sound crosses the trip point
const uint8_t KY_038_ANALOG_IN = A0;  // A0: the sound wave

void setup() {
  Serial.begin(9600);
  pinMode(LED_BUILTIN, OUTPUT);
  pinMode(KY_038_DIGITAL_IN, INPUT);
  pinMode(KY_038_ANALOG_IN, INPUT);
}

void loop() {
  int ky038_Dval = digitalRead(KY_038_DIGITAL_IN);
  int ky038_Aval = analogRead(KY_038_ANALOG_IN);

  if (ky038_Dval == HIGH)   // louder than the set point
    digitalWrite(LED_BUILTIN, HIGH);
  else
    digitalWrite(LED_BUILTIN, LOW);
  delay(5);                 // check often: sounds are short

  // Uncomment while you set the trim pot
  // Serial.print("Digital Value: ");
  // Serial.print(ky038_Dval);
  // Serial.print(" | ");
  // Serial.print("Analog value: ");
  // Serial.println(ky038_Aval);
}To set the trim pot, uncomment the prints and open the Serial Monitor at 9600 baud. In a quiet room, turn the screw until A0 sits just above 510 with D0 at 0; clockwise lowers A0, counter-clockwise raises it. Then make your sound right in front of the microphone. The course's notes say these modules are directional, so aim the sound straight at it.
Measure loudness: peak-to-peak
This sketch listens for 50 milliseconds at a time, keeps the highest and lowest readings, and prints the difference. That number grows with loudness. Better still, it doesn't care where the trim pot left the resting level, as long as the level isn't pinned at 0 or 1023.
const uint8_t KY_038_ANALOG_IN = A0;

void setup() {
  Serial.begin(9600);
}

void loop() {
  unsigned long start = millis();
  int lowest = 1023;
  int highest = 0;

  while (millis() - start < 50) {           // listen for 50 ms
    int sample = analogRead(KY_038_ANALOG_IN);
    if (sample < lowest) lowest = sample;
    if (sample > highest) highest = sample;
  }

  Serial.println(highest - lowest);          // the swing: louder = bigger
}Open Tools > Serial Plotter and try it: talk, tap the desk beside it, then blow across the microphone. Expect small numbers for a voice and big jumps for breath and taps close by. A 50 ms window holds several cycles of almost any sound you can make, and the reading still updates twenty times a second.
Build it: a candle you blow out
Blowing is the sound the KY-038 hears best, which makes this the perfect first build. The built-in LED is the candle: blow on the microphone and it goes out, then it lights again three seconds later.
const uint8_t KY_038_ANALOG_IN = A0;
const int BLOW = 100;   // set this between your talking and blowing swings

void setup() {
  pinMode(LED_BUILTIN, OUTPUT);
  digitalWrite(LED_BUILTIN, HIGH);   // the candle is lit
}

void loop() {
  unsigned long start = millis();
  int lowest = 1023;
  int highest = 0;
  while (millis() - start < 50) {
    int sample = analogRead(KY_038_ANALOG_IN);
    if (sample < lowest) lowest = sample;
    if (sample > highest) highest = sample;
  }

  if (highest - lowest > BLOW) {
    digitalWrite(LED_BUILTIN, LOW);    // blown out
    delay(3000);
    digitalWrite(LED_BUILTIN, HIGH);   // and lit again
  }
}Run the loudness sketch first and note the swing when you talk and when you blow, then set BLOW between the two so talking doesn't put the candle out. Want it to look like a real flame? Move the LED to a PWM pin and flicker its brightness with analogWrite(); the PWM article shows how.
KY-038 or KY-037?
The course's notes say the two work exactly the same way and differ only in the size and sensitivity of the microphone. The walkthroughs show the practical difference. The KY-037's big microphone picked up claps well, and it's the one the instructor would pick for a clap switch. The KY-038 mostly missed claps but caught breath, wind and close-up sounds. Pick the KY-038 when the sound happens right at the module: a blow, a tap on the case, a voice a few centimeters away.
Common problems
- Claps don't register. That's the small microphone at a distance. Get closer, aim it, or use the KY-037.
- The reading jumps around even in silence. Single readings land on random points of the wave. Use the peak-to-peak window instead.
- D0 stays at 1. The resting level is below 510. Turn the screw counter-clockwise.
- The swing is tiny or flat. The resting level may be pinned at 0 or 1023, which clips the wave. Turn the screw until A0 sits near the middle.
Watch it
The KY-038 walkthrough is lesson 30 of the SensorKit course. Every module in the 37-in-1 sensor kit covers the rest of the case. The analogRead article explains the 0 to 1023 reading, and millis() timing explains the 50 ms window.
37-in-1 Sensor Kit: Both sound sensors and 35 more modules in a latching case, with the free SensorKit course: 31 filmed walkthroughs and example code.
HERO Board: The Uno-compatible board the SensorKit walkthroughs are built around, with its USB cable.
Questions
What does the KY-038 sound sensor detect?
Sound close to its small microphone. It's best at loud or close sounds like breath, taps and a voice a few centimeters away. For claps across a room, use the KY-037.
How do I get a volume level from the KY-038?
Read A0 over a short window, such as 50 ms, and subtract the lowest reading from the highest. The bigger the swing, the louder the sound.
Should I use A0 or D0 on the KY-038?
D0 gives a simple loud-or-not at the trim pot's setting. A0 gives the sound wave itself, which you need to measure how loud something is.
Is the KY-038 the same as the KY-037?
Same circuit and same code; only the microphone differs. The KY-037's is bigger and more sensitive.