KY-028 digital temperature module: thermistor wiring and code
Updated
Don't let the name fool you. The KY-028 "digital temperature" module can't tell you it's 22 degrees. What it can do is flip a pin the moment it gets hotter than a temperature you choose, with no math in your code.
That makes it a thermostat, not a thermometer, and once you see it that way it's one of the most useful boards in the kit. Here's what's on it, why its reading goes down when it heats up, and how to set the point where it trips.
What's on the board
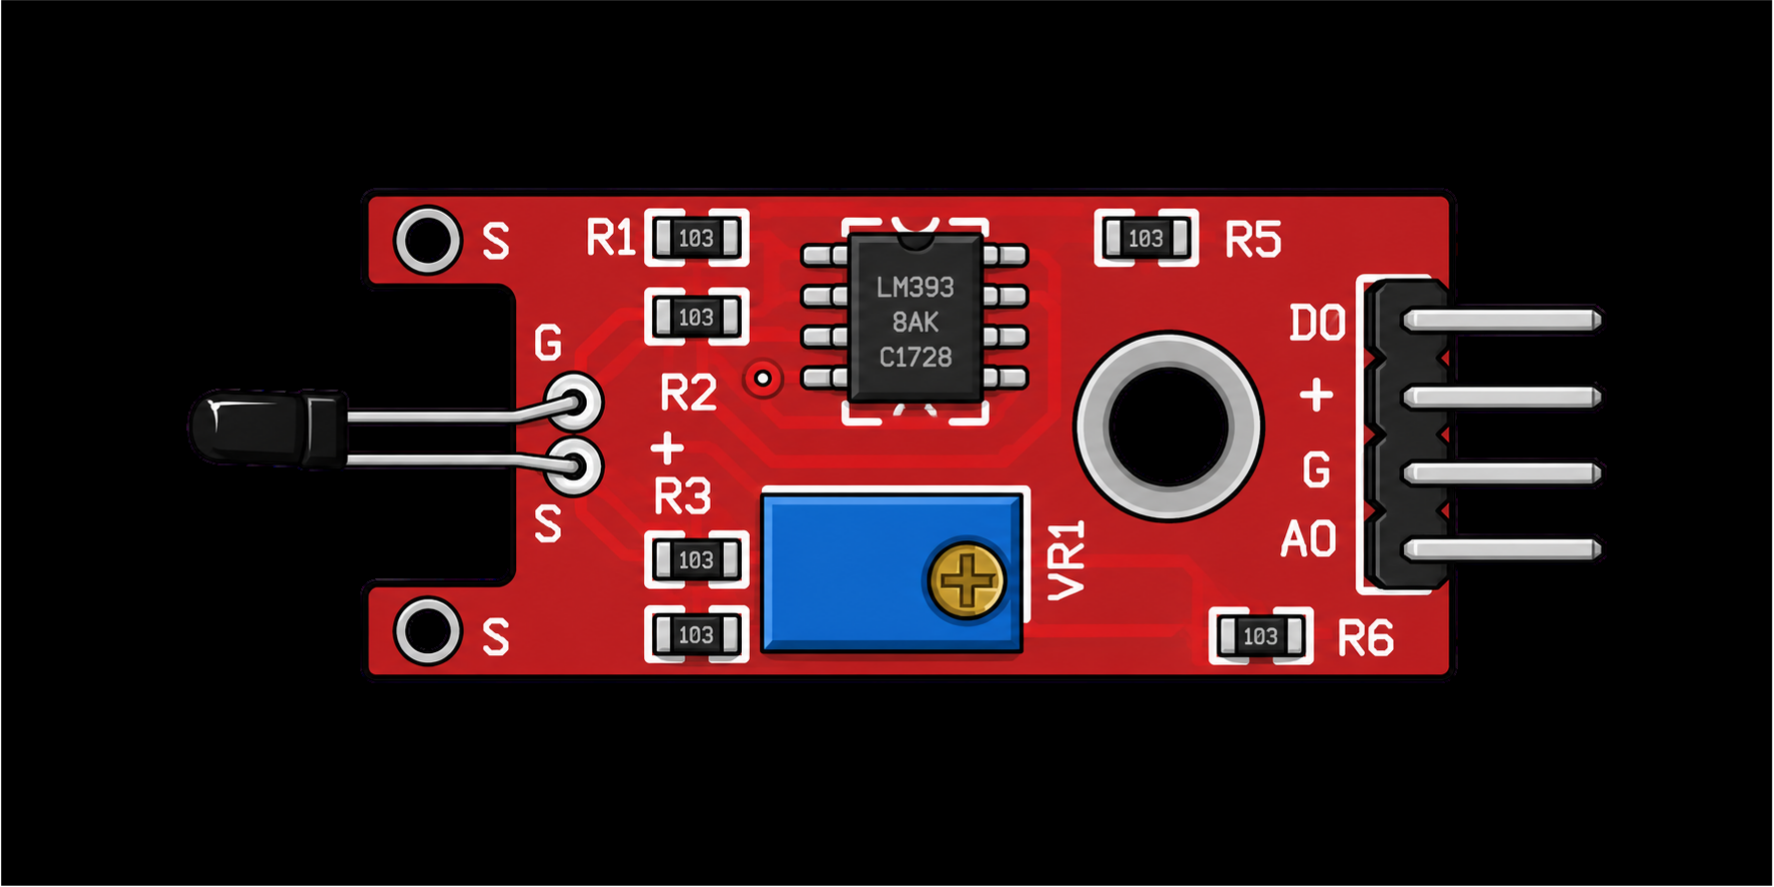
- An NTC thermistor: the black bead on two legs at the end. NTC stands for negative temperature coefficient: its resistance falls as it warms.
- An LM393 comparator: the 8-legged chip. It compares the thermistor's voltage with a fixed point and turns the answer into a clean on or off.
- A blue trim pot with a brass screw, for setting the trip point.
- Two LEDs: one for power, and one that lights when the comparator has tripped.
- A 4-pin header: D0 (the digital output), + (5 V), G (ground) and A0 (the analog output).
It's one of the seven red boards with a blue trim pot in the 37-in-1 kit. The course's notes say six of them, this one included, work the same way and run the same sketch with different variable names. Only the sensor at the end changes.
How it reads, and why it reads backwards
The thermistor sits in a voltage divider, and A0 is the middle of it. As the thermistor warms, its resistance drops and the A0 reading falls. The course's notes put it plainly: as temperature increases, the analog value decreases. In the walkthrough, heat held under the module made the line on the Serial Plotter dip, and it climbed back as the module cooled.
The comparator watches that same voltage. When the reading falls below about 510, roughly half of 1023, D0 switches from 0 to 1 and the second LED lights. So D0 = 1 means hotter than your set point.
The trim pot is the part people misread. On the bench, turning the screw moves the analog reading itself: clockwise lowers it, counter-clockwise raises it. The trip point stays at about 510. Turning the screw slides the reading toward that line or away from it, which decides how much warming it takes to cross.
These boards are detectors, not calibrated sensors. The course's notes are firm about it: the numbers aren't meant to be converted into degrees.
Wiring the KY-028 to the HERO Board
| KY-028 pin | HERO Board | What it carries |
|---|---|---|
| D0 | Pin 8 | On/off: 1 when hotter than the set point |
| + | 5V | Power |
| G | GND | Ground |
| A0 | A0 | The raw level, lower when warmer |
The walkthrough wires just A0, G and + and watches the analog line on the Serial Plotter. The course's sketch also reads D0 on pin 8 and lights the board's built-in LED when it trips. Wire all four and you can do both.
The code
No library needed. This is the course's sketch, without its comment banner:
const uint8_t KY_028_DIGITAL_IN = 8;  // D0: 1 when hotter than the set point
const uint8_t KY_028_ANALOG_IN = A0;  // A0: falls as the thermistor warms

void setup() {
  Serial.begin(9600);
  pinMode(LED_BUILTIN, OUTPUT);
  pinMode(KY_028_DIGITAL_IN, INPUT);
  pinMode(KY_028_ANALOG_IN, INPUT);
}

void loop() {
  int ky028_Dval = digitalRead(KY_028_DIGITAL_IN);
  int ky028_Aval = analogRead(KY_028_ANALOG_IN);

  if (ky028_Dval == HIGH)   // hotter than the set point
    digitalWrite(LED_BUILTIN, HIGH);
  else                      // cooler than the set point
    digitalWrite(LED_BUILTIN, LOW);
  delay(150);               // how often to check

  // Uncomment to watch the numbers while you calibrate
  // Serial.print("Digital Value: ");
  // Serial.print(ky028_Dval);
  // Serial.print(" | ");
  // Serial.print("Analog value: ");
  // Serial.println(ky028_Aval);
}The delay(150) means it checks six or seven times a second, plenty for something as slow as temperature. Uncomment the five Serial.print lines when you calibrate and open the Serial Monitor at 9600 baud. Or skip the words and print only ky028_Aval, then open Tools > Serial Plotter to watch the line dip as it warms, the way the walkthrough does.
Set the trip point
The course's own example is a computer case you don't want going above 100 °F (about 38 °C):
- Put the module somewhere that holds steady at the temperature you want it to trip at.
- Uncomment the Serial prints and watch A0.
- Turn the screw until A0 crosses about 510, D0 changes to 1 and the second LED comes on. That's your trip point.
- Back at room temperature, A0 climbs above 510 and D0 drops back to 0. Mount the module in the case: when the inside warms past the point you set, D0 goes to 1, and your sketch can switch on a fan.
Then fine-tune by eye. Nudge the screw until the second LED comes on reliably at your temperature and stays off below it. For a quick test without a flame, pinch the thermistor between your fingers or hold it near a mug of hot water.
KY-028, KY-001 or KY-015?
Use the KY-028 when you want a yes or a no at one temperature, set by hand, with the simplest code in the kit. When you need the temperature itself, use the KY-001, whose DS18B20 reads to a fraction of a degree. If you want humidity as well, the KY-015's DHT11 gives you both, in whole numbers.
The KY-028 also has a speed advantage: it's an analog part, so a fresh reading is there every time you call analogRead(), with no protocol to wait on. That's handy when you want to watch something heat up in real time.
What to build with it
- A fan switch. The course's case-cooling idea: when D0 trips, turn on a small fan through the kit's KY-019 relay.
- An overheating warning. Beep the KY-012 buzzer when a motor, a lamp or anything else you're watching gets too warm.
- A heat trend. Plot A0 in the Serial Plotter, as the walkthrough does, to watch something heat up and cool down.
- A warm-hands game. Who can trip the LED fastest by holding the thermistor?
Common problems
- D0 never changes. The reading never crosses about 510. Watch A0 and turn the screw until it sits just above 510 at room temperature, so a little warmth tips it under.
- D0 is stuck at 1. The reading is already below 510. Turn the screw counter-clockwise to raise it.
- It flickers on and off at the trip point. Right at the line, tiny changes flip it back and forth. Set the point a little further from room temperature, or have your code ignore changes that last less than a second.
- The reading runs backwards. It's meant to: hotter means lower.
- It won't tell you degrees. It isn't built to. Use the KY-001.
Watch it
The KY-028 walkthrough is lesson 23 of the SensorKit course, and the 37-in-1 sensor kit guide covers the rest of the case. The Help Center's analogRead article explains the 0 to 1023 reading behind A0.
37-in-1 Sensor Kit: All three temperature modules, the KY-028 among them, and 34 more in a latching case, with the free SensorKit course and its example code.
HERO Board: The Uno-compatible board the SensorKit walkthroughs are built around, with its USB cable.
Questions
Does the KY-028 measure temperature in degrees?
Not really. It's a thermistor and a comparator, built as a temperature switch. Its analog reading changes with heat but isn't calibrated; for degrees, use the KY-001.
Why does the KY-028's analog value go down when it gets hotter?
Its thermistor is NTC: its resistance falls as it warms, which pulls the A0 voltage down.
What does the KY-028's D0 pin do?
It switches to 1 when the analog reading drops below about 510, which happens when the module is hotter than the point you set with the trim pot.
Which way do I turn the KY-028's potentiometer?
Clockwise lowers the analog reading and counter-clockwise raises it. Set it just above 510 at room temperature and a little warmth will trip it.