KY-026 flame sensor module: wiring, code and calibration
Updated
The KY-026 doesn't see fire. It sees infrared light, and a flame gives off plenty of it. Point it at a candle and its reading drops; blow the candle out and the reading climbs back.
That difference matters for everything you do with it, from where you test it to why it's no smoke alarm. Here's what's on the board, the real distances it worked at on the course's bench, and how to set it to trigger where you want.
What's on the board
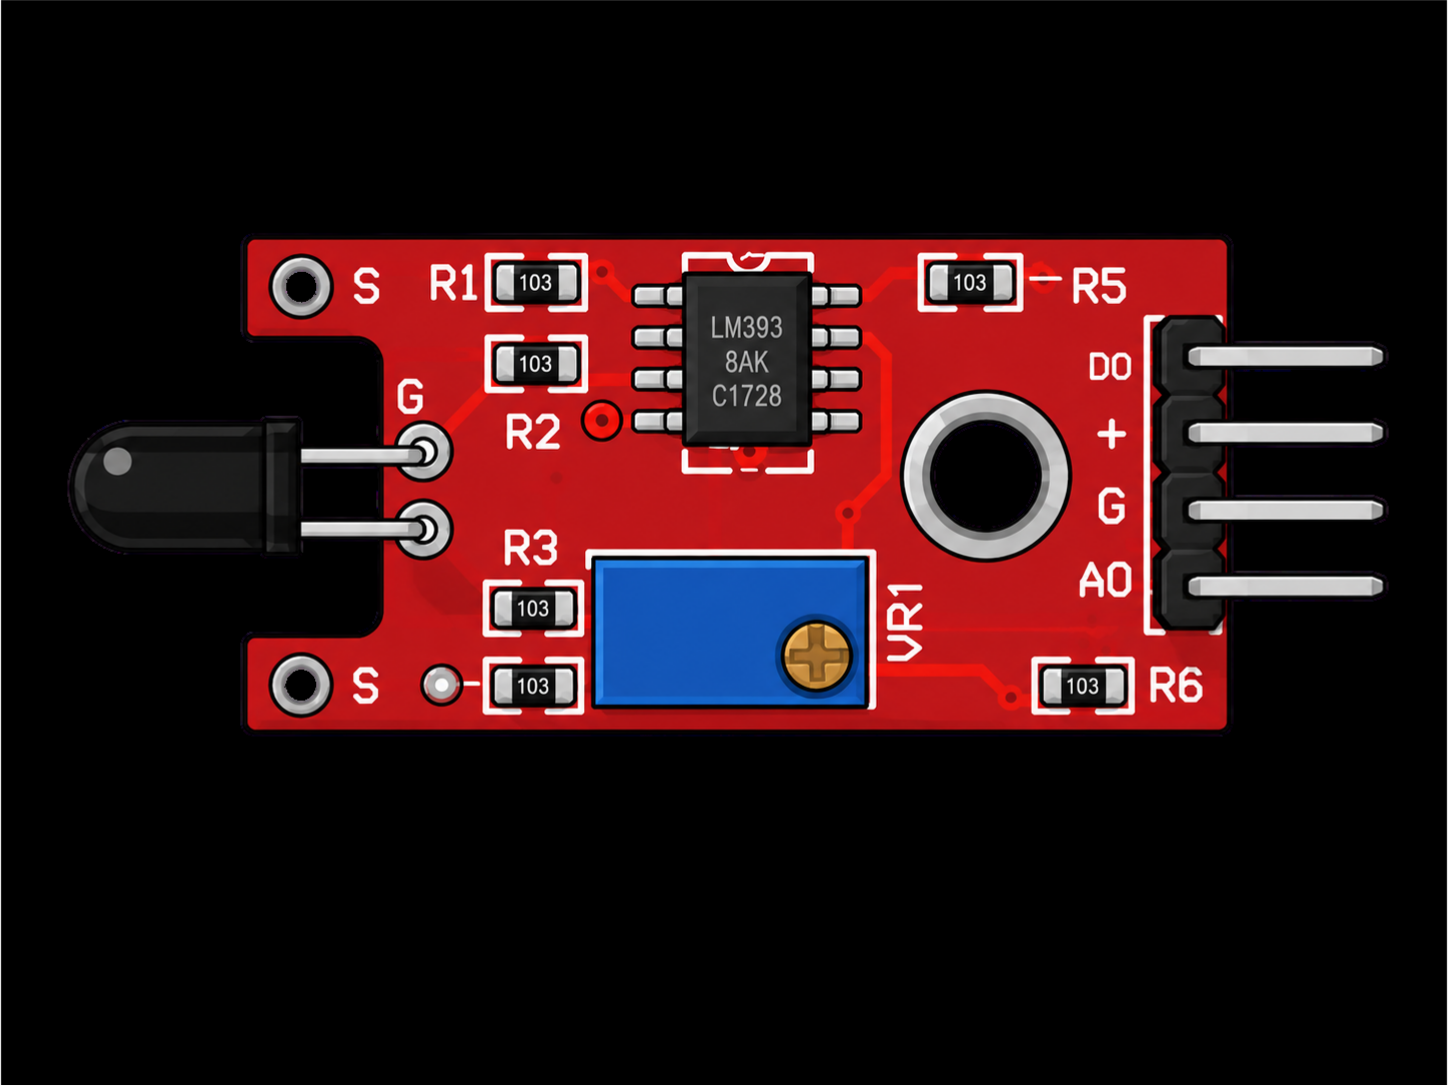
- An infrared sensor: the dark, bulb-shaped part on long legs at the end. It's dark because its package blocks most visible light and lets infrared through.
- An LM393 comparator, the 8-legged chip, which turns the sensor's reading into a clean on or off.
- A blue trim pot for sensitivity.
- Two LEDs: one for power, and one that lights when the comparator trips.
- A 4-pin header: D0 (digital out), + (5 V), G (ground) and A0 (analog out).
The legs are long so you can bend them and aim the sensor. It sees best straight ahead, and the walkthrough's advice is simple: line it up with the flame.
How it reads
With no flame in view, the course's sketch reads D0 = 0 and A0 close to 1023; in the walkthrough it sat around 1000. As infrared reaches the sensor, A0 falls. The stronger or closer the flame, the lower the number.
The comparator flips D0 to 1 when A0 drops below about 510, and the second LED lights. The trim pot doesn't move that 510 line. It shifts the analog reading: clockwise lowers it, counter-clockwise raises it. Turning the screw is how you decide how much flame it takes to cross the line.
Anything that gives off infrared counts, not just flames. Sunlight is full of it, and so are incandescent bulbs and heaters, so test away from windows and hot lamps.
What the bench found
When the course's sketch was written, it was tested with a candle in a brightly lit room. The results are worth knowing before you start:
- At 25 cm (10 inches) the sensor was overwhelmed: D0 = 1, A0 = 32, and no setting of the trim pot would make it ignore the flame.
- Anywhere closer than about 45 cm (18 inches) it stayed saturated, with A0 bottoming out in the 30s. You can't calibrate it there.
- As the candle moved away, A0 climbed steadily, and at about 1 m (3 feet) setting the trigger point was easy.
In the walkthrough, a lighter about 30 cm (a foot) away still registered. So the KY-026 is more sensitive than most people expect. Calibrate it from across the desk, not up close.
Wiring the KY-026 to the HERO Board
| KY-026 pin | HERO Board | What it carries |
|---|---|---|
| A0 | A0 | How much infrared: lower means more |
| G | GND | Ground |
| + | 5V | Power |
| D0 | Pin 8 | Flame or no flame, at your set point |
Double-check the A0 wire. In the walkthrough it went into A5 instead of A0 by mistake. The reading sat at around 200 and wouldn't respond, and it took 20 minutes of troubleshooting to spot. An analog pin with nothing on it drifts, so a stuck, meaningless number usually means a wire is one hole off.
The code
No library needed. This is the course's sketch, without its long comment header:
const uint8_t KY_026_DIGITAL_IN = 8;  // D0: 1 when a flame is detected
const uint8_t KY_026_ANALOG_IN = A0;  // A0: lower = more infrared

void setup() {
  Serial.begin(9600);
  pinMode(LED_BUILTIN, OUTPUT);
  pinMode(KY_026_DIGITAL_IN, INPUT);
  pinMode(KY_026_ANALOG_IN, INPUT);
}

void loop() {
  int ky026_Dval = digitalRead(KY_026_DIGITAL_IN);
  int ky026_Aval = analogRead(KY_026_ANALOG_IN);

  if (ky026_Dval == HIGH)   // flame detected
    digitalWrite(LED_BUILTIN, HIGH);
  else                      // no flame
    digitalWrite(LED_BUILTIN, LOW);
  delay(150);               // how often to check

  // Uncomment to see what the sensor sends (you'll need it to calibrate)
  // Serial.print("Digital Value: ");
  // Serial.print(ky026_Dval);
  // Serial.print(" | ");
  // Serial.print("Analog value: ");
  // Serial.println(ky026_Aval);
}It lights the board's built-in LED whenever D0 says flame. In the walkthrough the instructor suggests driving something useful instead, like a fan. Uncomment the Serial.print lines and open the Serial Monitor at 9600 baud, and you have everything you need to calibrate.
Calibrate it
- Run the sketch with the prints on and no flame anywhere near. You should see D0 = 0 and A0 near 1023.
- With an adult around, light a candle about 1 m from the sensor, aimed straight at it. A0 should drop below 1023. While it stays above about 510, D0 stays 0.
- Turn the screw clockwise to lower A0 until it crosses about 510. D0 flips to 1 and the second LED comes on.
- Back the screw off a touch and creep up on that point until the LED comes on reliably with the candle lit and goes off when you blow it out.
Every flame and every room is different, so calibrate again whenever you move the setup.
What it's good for, and what it isn't
The course's notes are blunt: this is a sensor for learning and hobby projects, not for anything where a fire really matters. It can't tell a flame from sunlight, and it only sees what's in front of it. For safety, a smoke alarm does the job.
What it does well is notice a small flame that's meant to be there, or one that has just appeared. The course suggests checking a pilot light, or a switch that a flame turns on. A few more:
- A candle-out alarm. Sound the kit's KY-012 buzzer when the candle you're watching goes out, which is when D0 drops back to 0.
- A birthday-candle game. Count how long it takes someone to blow the candle out.
- A flame-activated fan, the walkthrough's own idea: swap the built-in LED for a small fan on the KY-019 relay.
Common problems
- Always triggered. The flame is too close or there's too much infrared about: within about 45 cm a candle saturates it. Move the flame back, keep sunlight off the sensor, and calibrate again.
- A0 stuck around 200, ignoring the flame. The wire is on the wrong analog pin.
- Never triggers. A0 never gets below 510. Turn the screw clockwise, and check the sensor points at the flame.
- Triggers near a window. That's sunlight. Shade the sensor or move it.
Watch it
The KY-026 walkthrough is lesson 21 of the SensorKit course, and every module in the 37-in-1 sensor kit covers the rest of the case. The KY-028 uses the same red comparator board with a thermistor instead, and the analogRead article explains the 0 to 1023 reading.
37-in-1 Sensor Kit: The KY-026 and 36 more modules in a latching case, with the free SensorKit course: 31 filmed walkthroughs and example code.
HERO Board: The Uno-compatible board the SensorKit walkthroughs are built around, with its USB cable.
Questions
How far away can the KY-026 detect a flame?
In the course's bench test a candle was easy to calibrate at about 1 m, and in the walkthrough a lighter still registered at about 30 cm. Closer than about 45 cm, a candle saturated it.
Does the KY-026 detect fire or smoke?
Neither directly. It detects infrared light, which flames give off, and it can't tell a flame from sunlight or a hot lamp. Don't use it as a fire alarm.
Should I use the KY-026's A0 or D0 pin?
D0 gives a clean flame or no flame at the point you set with the trim pot. A0 gives the raw level, which falls as the flame gets stronger or closer. The course's sketch reads both.
Why is my KY-026 always on?
It's saturated: the flame is too close, or there's sunlight or a hot lamp in view. Move the flame back to about a meter and set the trim pot again.