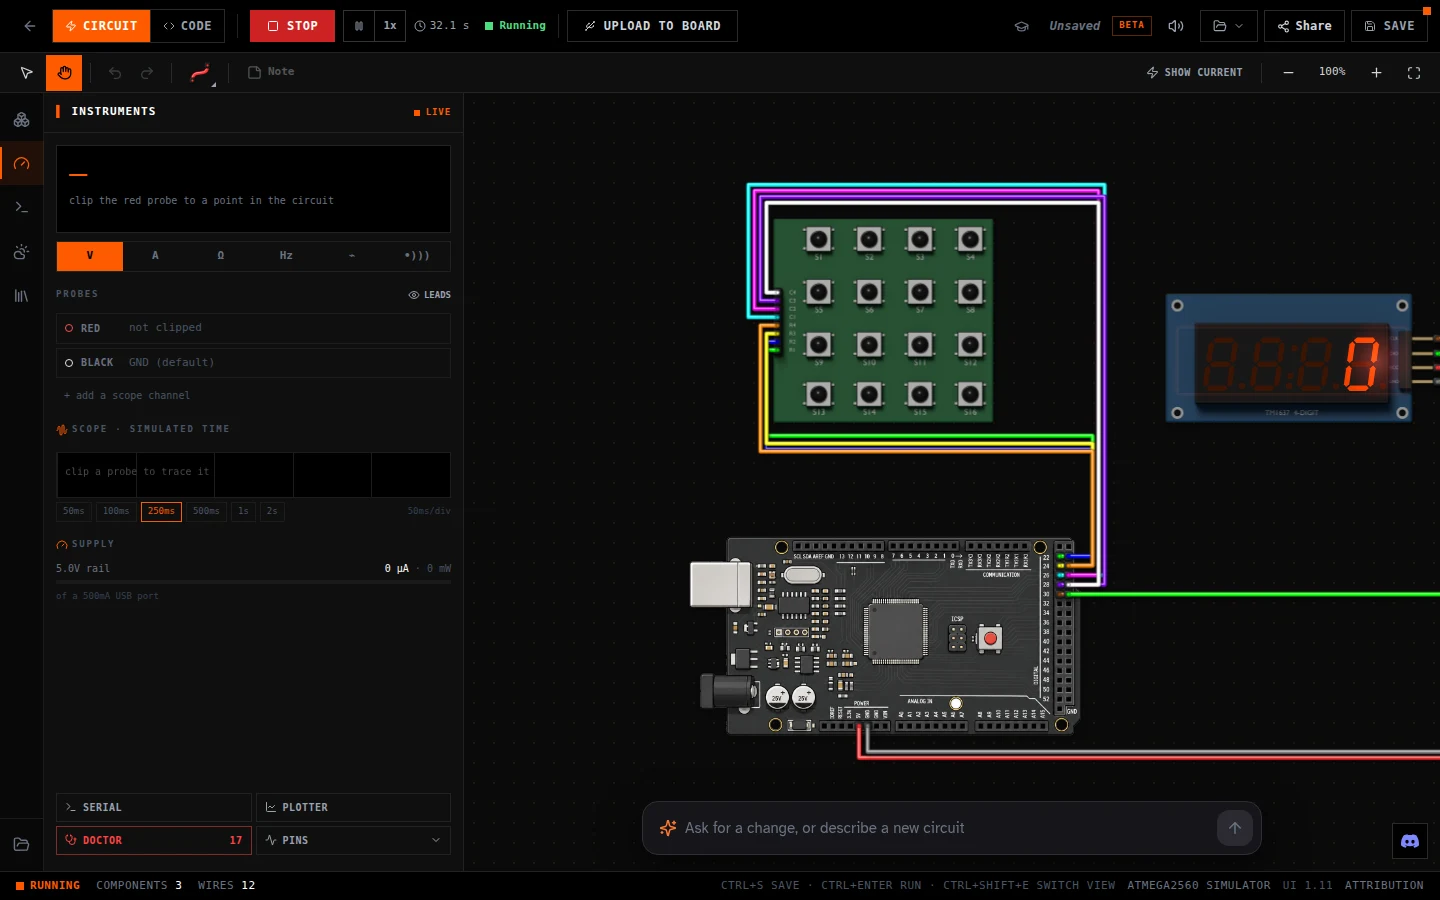
Arduino Mega simulator: the HERO XL in your browser
Updated
Some builds outgrow a Uno in an afternoon. A keypad takes eight pins, a display two more, a few buttons and LEDs and you're out. The Mega was made for that moment, and the HERO XL is our Mega 2560-compatible board: same ATmega2560 chip, same pin layout, so Mega sketches run on it as written.
In the simulator it runs on an emulated ATmega2560 at 16 MHz, with every pin you'd have on the bench. Wire a circuit across pins 22 to 53, write the code, and press Run.
Open a HERO XL circuit · A keypad and a 4-digit display on the Mega pins, ready to run. Free, on a computer or tablet.
Run it: A number pad on the HERO XL · Press Run, then type on the keypad: the digits appear on the display, and # prints the number to Serial.
Uno or Mega: what the XL adds
| HERO Board (Uno-compatible) | HERO XL (Mega-compatible) | |
|---|---|---|
| Chip | ATmega328P | ATmega2560 |
| Speed | 16 MHz | 16 MHz |
| Flash for your program | 32 KB | 256 KB |
| RAM | 2 KB | 8 KB |
| EEPROM | 1 KB | 4 KB |
| Digital pins | 14 (6 with PWM) | 54 (15 with PWM) |
| Analog inputs | 6 | 16 |
| Hardware serial ports | 1 | 4 |
Same language, same libraries, same parts. The XL simply has more of everything.
The extra RAM is the one beginners notice first. A sketch that draws on the OLED, reads a keypad and keeps a few arrays can run out of the Uno's 2 KB; on the XL it has four times the room.
What's simulated on the XL
- All 54 digital pins and 16 analog inputs, with
digitalRead(),digitalWrite(),analogRead()andanalogWrite()on the PWM pins. - The extra timers (3, 4 and 5) that libraries like Servo use on a Mega.
- Serial on pins 0 and 1 goes to the Serial Monitor and plotter, as on the Uno. Serial1 to Serial3 print to the console too, but don't connect to other parts yet.
- I2C, SPI and EEPROM, so the OLED, the 4-digit display and saved settings work as they do on the real board.
- The same 46 parts and the same proven libraries as the Uno-compatible simulator: U8g2, TM1637Display, Keypad, BasicEncoder, Servo and the sensor libraries.
- The bench instruments: a meter, a scope, a supply meter and the circuit doctor.
Moving a Uno sketch to the XL
Nearly every Uno sketch runs on the XL without changes, because the pins you know (0 to 13, A0 to A5) are in the same place. The two exceptions are the pins that do special jobs. I2C moves from A4 and A5 to pins 20 (SDA) and 21 (SCL), and SPI moves to pins 50 to 53. If your screen worked on the Uno and goes blank on the XL, that's almost always why.
The circuit above shows the other habit worth learning: use the XL's own pins. The keypad sits on 22 to 29 and the display on 30 and 31, which leaves every Uno pin free for whatever comes next. These are the lines that changed from the Uno version:
const byte ROW_PINS[ROWS] = { 22, 23, 24, 25 };   // the HERO XL's extra pins: a Uno stops at 13
const byte COL_PINS[COLS] = { 26, 27, 28, 29 };
Keypad keypad = Keypad(makeKeymap(BUTTONS), ROW_PINS, COL_PINS, ROWS, COLS);

TM1637Display display(30, 31); // CLK on 30, DIO on 31The keypad library and TM1637 guide cover the rest of that code, and the keypad door lock project builds a bigger version on the Uno-compatible board.
Start a HERO XL circuit from scratch
- Open the simulator and choose HERO XL from the boards.
- Drag in a breadboard and your parts, and wire them to the XL's pins. Its 5 V and GND pins are along the power header, like the Uno's.
- Switch to Code, write or paste your sketch, and press Run. The status bar reads ATMEGA2560 SIMULATOR while it runs.
- Plug in a real HERO XL and press Upload to Board to send the same program to it, in Chrome or Edge.
Open the simulator · Pick the HERO XL in the board chooser.
Adventure Kit: Pandora's Box: The kit built around the HERO XL, with its prototype shield, parts and an advanced course.
Questions
Is this an Arduino Mega simulator?
It simulates the HERO XL, which is Mega 2560-compatible: the same ATmega2560 chip and pin layout. Sketches written for a Mega 2560 run on it unchanged.
Will my Uno code run on the Mega simulator?
Almost always. Pins 0 to 13 and A0 to A5 are where you expect. Only I2C (pins 20 and 21 on the Mega) and SPI (50 to 53) move.
Can I use Serial1, Serial2 and Serial3?
Yes for printing: they show in the console. They don't yet connect to other parts in the simulator, so a device on Serial1 won't answer.
Is it free?
Yes. Building, running and uploading are free and need no account. A free account saves your projects and lets you share them.